

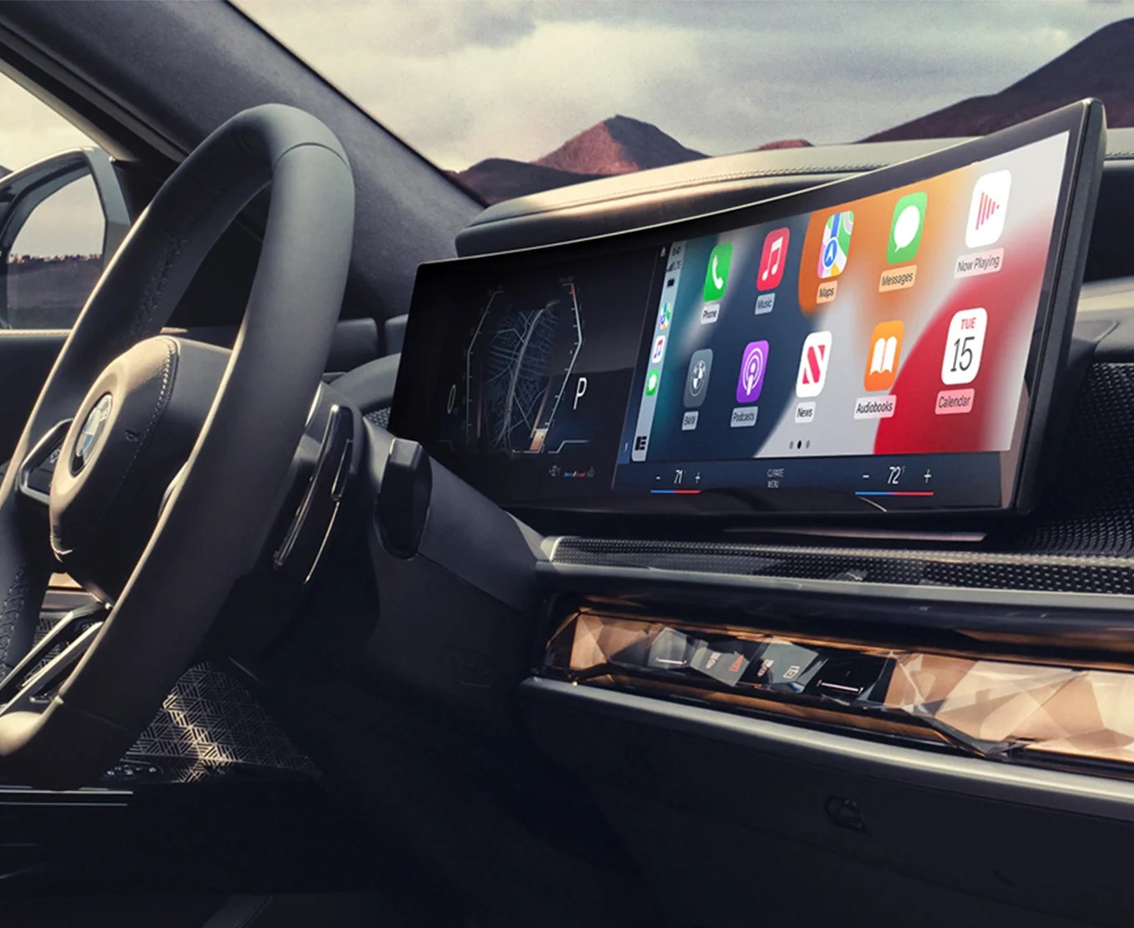
Mileage Blocker for the BMW 3 Series Curved Screen 2023+ (G20/G21/G80/G81) iDrive 8
Enter the coupon code at checkout to apply your discount.
For off-road, testings, dyno and development use only.
If you’re a trade customer or regularly purchase multiple units, please contact us on +44 (0) 7516 391806 to discuss trade pricing and volume discounts.
Overview
The BMW 3 Series mileage blocker is a vehicle-specific plug-in module for compatible G20, G21, G80 and G81 applications with the specified Curved Display and iDrive 8 configuration.
The module is designed to control new mileage recording while it is active and connects through the vehicle’s existing wiring without permanent modifications such as cutting or soldering. The correct application depends on the BMW’s chassis, model year, instrument display, and electronic configuration.
This product is supplied strictly for authorised off-road, dyno testing, motorsport, vehicle development and other permitted applications.
Compatibility
This BMW 3 Series mileage blocker is compatible with:
- BMW 3 Series G20 / G20 LCI
- BMW 3 Series G21 / G21 LCI
- BMW M3 G80
- BMW M3 Touring G81
- 2023 onward model years, subject to vehicle specification
- BMW Curved Display configuration
- Compatible iDrive 8 configuration
The display configuration is an important part of the fitment check. Compare your instrument cluster with the product images before ordering.
If you are unsure whether this module matches your BMW, contact us with your VIN, model year and a clear photograph of your dashboard.
Key Features
- Vehicle-specific design: Developed for the listed BMW G20, G21, G80 and G81 applications rather than as a universal BMW module.
- Curved Display compatibility: Designed for supported BMW vehicles using the specified Curved Display configuration.
- iDrive 8 application: Intended for compatible iDrive 8-era vehicle configurations.
- Plug-and-play installation: Connects through the supplied vehicle connection without cutting or soldering the original wiring.
- OEM-style connectors: Supplied with compatible plug connections for a secure installation.
- Switchable operation: Allows the module to be enabled or disabled for its intended application.
- Memory function: Retains its operating setting where supported by the module.
- Removable design: Can be disconnected without permanently modifying the vehicle’s original wiring.
- Normal vehicle operation: When returned to its standard operating state, the vehicle resumes normal mileage recording.
How Does the BMW 3 Series Mileage Blocker Work?
The BMW 3 Series mileage blocker connects to the vehicle through its supplied plug-in connection and controls new mileage recording while the module is active.
It does not change mileage that was already recorded by the vehicle. When the module is deactivated or removed, the BMW returns to its normal mileage-recording operation.
Because the G20, G21, G80 and G81 cover different vehicle configurations, the exact operation depends on the specified chassis, instrument display and electronic setup. Selecting the correct version is therefore essential.
Quality and Testing
Each module is prepared for its specified BMW application and checked before dispatch.
The module is supplied with installation guidance. If you are unfamiliar with BMW vehicle electronics or instrument-cluster connections, professional installation is recommended.
For general fitting information, see the mileage blocker installation guide.
Vehicle-Specific Information
- Curved-screen / iDrive 8 version: the module connects at the white plug behind the lower guard/trim panel rather than by removing the curved display. After fitting, lock the vehicle for approximately 2 minutes before checking operation.
If you are unsure about compatibility, please contact us with your VIN and a clear photo of the dashboard / instrument cluster before ordering.
Curved-Screen Installation & Troubleshooting
- Installation is through the white plug behind the lower guard / trim panel; the curved display itself does not need to be removed.
- After installation, close the doors and lock the vehicle for approximately 2 minutes before testing.
- If the screen does not light, lock the vehicle for approximately 5 minutes and then unlock it before rechecking.
- A temporary engine warning light or -40° outside-temperature reading can normally be cleared by moving the vehicle, stopping and switching it off, repeated approximately 3–5 times; a suitable diagnostic tool can also be used where required.
Full Installation Instructions
- Switch the vehicle off and allow the electrical system to shut down.
- Remove the lower guard plate / trim panel shown in the vehicle-specific fitting guide.
- Locate the white plug behind the lower guard / trim area and disconnect it.
- Connect the module as shown in the supplied fitting images:
- Connect the module/product plugs to the matching vehicle-side connections.
- Connect the vehicle’s original white plug to the corresponding module connector.
- Check that every plug is fully seated and correctly oriented.
- Route and secure the module wiring so it cannot be trapped, pinched or strained.
- Refit the guard plate / trim panel.
- Close all vehicle doors and lock the vehicle for approximately 2 minutes.
- Unlock the vehicle, start it and confirm the display and normal vehicle functions are operating correctly.
Post-Installation Notes
- If the screen does not light up after installation, close all doors and lock the vehicle. Wait approximately 5 minutes, then unlock the vehicle and check the screen again.
- If the engine warning light appears, move the vehicle, stop it and switch the engine off. Repeat this procedure approximately 3–5 times. The warning should clear. It can also be cleared using a suitable diagnostic tool.
- If the outside-temperature display shows -40°, move the vehicle, stop it and switch the engine off. Repeat this procedure approximately 3–5 times. The temperature display should return to normal. This can also be cleared using a suitable diagnostic tool.
Important
- This curved-screen version connects at the white plug behind the lower guard / trim area. The curved display itself does not need to be removed for this installation.
- Do not force any connector. If a plug does not seat correctly, check its orientation before continuing.
- Please note that vouchers cannot be used to purchase curved screen items.
Activation / Mode Change
- Start the vehicle before activating or deactivating the module.
- Press and hold the BC button for 6 seconds to change to the next mode.
- Repeat the 6-second BC-button hold each time you want to cycle to the next mode.
Modes
- Mode 1 — Emergency flashers flash 2 times: mileage stops counting.
- Mode 2 — Emergency flashers flash 3 times: mileage records 10%.
- Mode 3 — Emergency flashers flash 4 times: mileage records 50%.
- Mode 4 — Emergency flashers flash 1 time: normal operation / 100% mileage counting.
Confirmation
- The number of emergency-flasher flashes confirms the selected mode.
- When changing modes, the buzzer also indicates the filtered mileage stored by the module: 1 buzzer signal represents approximately 5,000 km, 2 signals approximately 10,000 km, and so on.
Return To Normal
- Cycle to Mode 4 by holding the BC button for 6 seconds until the emergency flashers flash once.
Shipping and availability
- UK and worldwide shipping available.
- Most in-stock orders are dispatched the same day.
- Next working day UK delivery options are available at checkout for eligible in-stock orders.
- International delivery options are available depending on destination.
Important Information
This product is supplied strictly for off-road, motorsport, dyno testing, vehicle development and tuning purposes.
The customer is responsible for ensuring that the purchase, installation and use of the mileage blocker comply with all applicable laws and regulations in their country or region.
If you have questions about G20, G21, G80 or G81 compatibility, Curved Display configuration or installation, contact the Smelecom team before placing your order.
| Installation | Plug & Play |
|---|---|
| SKU | 2 - BMW Curved |
| Weight | 0.5 kg |
| Package Dimensions | 12 × 10 × 2 cm |
Is it difficult to install?
No. This module is plug-and-play — no cutting, soldering or coding required. Most installs take under 30 minutes.
Will it leave any errors after removal?
No. The module saves the last setting and leaves no error messages or mileage jump after removal.
Is it covered by a warranty?
Yes — every module comes with a 6-month warranty against manufacturing faults, plus our hassle-free 14-day returns. Please note our products are supplied strictly for off-road, testing, dyno and development use only.
 Mileage Blocker for the BMW 3 Series Curved Screen 2023+ (G20/G21/G80/G81) iDrive 8
You may also like
-
BMW
 2023+
2023+Mileage Blocker for the BMW 2 Series Curved Screen 2023+ (F44/G42/G87) iDrive 8
£850.00 + VATPlug & Play Mileage Data OBD Ready Secure ChipView Product -
BMW
 2019+
2019+Stop KM/Mile Freezer for the BMW 3 Series G20/G21 With Working Speedo!!
£190.00 + VATPlug & Play Mileage Data OBD Ready Secure ChipView Product -
BMW
2013–2020
Stop KM/Miles Freezer for the BMW i8 I12 Coupe
£190.00 + VATPlug & Play Mileage Data OBD Ready Secure ChipView Product -
BMW
2023+
Mileage Blocker for the BMW 4er G22/G23/G26/G83/I4 Curved Screen 2023 iDrive 8
£850.00 + VATPlug & Play Mileage Data OBD Ready Secure ChipView Product


Reviews
There are no reviews yet